
GT Luscombe recently sent me one of their Foundations Bible Journaling Kits. If you are new to Bible journaling this kit has everything you need to get started.
This kit contains:
- Mechanical Pencil 0.7 mm w/Refillable Eraser
- Pigma Micron Pen Black 03
- Pigma Graphic One Pen
- White Gelly Roll Pen 08
- Stardust Clear Sparkle Pen
- 6″ Books of the Bible Ruler
- Color Pencil Set (12 Pencils, Sharpener, Eraser, & Case)
- Watercolor Paint Set (21 Watercolors & 2 Brushes)
- Tracing Paper Pad
- Graphite Paper
GT Luscombe has been in the business of finding and distributing Bible friendly pens and pencils for years so it’s only natural that they branched out into finding a wider array of Bible friendly art supplies once Bible art journaling started to gain popularity. They work with Jann Gray (author of Illuminated Journaling and Stones of Remembrance) to help them test a variety of products and this kit contains the items she finds most essential.
GT Luscombe provided this journaling kit free for review. I was not required to give a positive review, only an honest one. All opinions are my own.
_________________________________________________________
This kit is available at (includes some affiliate links)
Illuminated Journaling (Jann Gray’s site)
and many local Bible bookstores
_________________________________________________________
Mechanical Pencil, Pens, & Ruler

All of your basic writing needs are covered with these. A mechanical pencil for sketching and note taking, a good quality white pen for highlighting and writing on top of darker colors, a silver glitter pen for adding a touch of sparkle here and there, a high quality thin black pen for writing and outlining, and a slightly wider tipped pen with a flexible tip that allows you to get varying width lines from the same pen (you can tell I’m not good at varying the pressure within the same line yet).
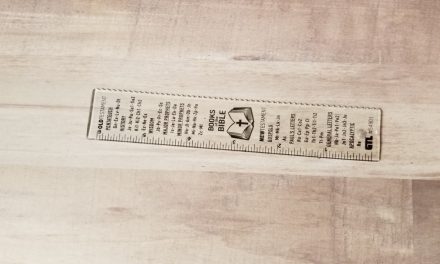
Also included is a 6″ clear ruler that could be used as a bookmark with the books of the Bible printed on it. The uneven edge is intended to be used to tear paper that could be used for notes, bookmarks, or tip-ins but it also makes a pretty scalloped line when traced along.
Colored Pencil Set

Colored pencils are the perfect first colored medium for putting in a Bible. They are easy to use, never bleed, and can even be (carefully) erased if you make a mistake. This set includes 12 colored pencils, a pencil sharpener, a kneadable eraser, and a handy carry case.
The pencils are a good basic assortment of colors. The pencil sharpener works well without breaking leads or chewing up the pencils. A kneadable eraser is a nice addition since it can be shaped to do more precise erasing. It’s also nice because kneadable and white erasers work better in Bibles than pink erasers.
The carry case is a nice size (color will vary from kit to kit) and the zipper works smoothly and seems durable. You could fit at least another dozen pens or pencils in the case. It easily fit in either of my pocketbooks and the clip would be handy for fastening it to a backpack or belt loop. I frequently carried my supplies around in this while working on this post.

This picture was done with the Royal Langnickel colored pencil set. I can see a few places on the lettering I need to touch up with the eraser.
Watercolor Set
Some people are a bit scared to use anything wet in their Bibles but watercolors and most Bible paper work well together. The sizing that most Bible paper has to help resist the oils in our hands also helps watercolor paint float on the top of the paper instead of soaking in immediately.

GT Luscombe includes a set of beginners level artist grade watercolors in this kit. Watercolors is one of the mediums I highly recommend artist grade for. I’ve had a couple bad experiences with the student grade (Crayola) watercolors available at most big box stores.

This picture was done with the Royal Langenickel watercolors directly on the Bible paper. The only other supply used was the white gelly roll pen over the watercolors for the words and the white wave caps. Watercolors will crinkle your paper slightly but most crinkling will smooth out while the Bible is stored closed.
There are a few tricks to getting the best results with watercolor. You want to use enough water but not too much and dry the page often. Too little water and you tend to scrub the paint into the paper to get it to cover the paper which pushes the pigments past the sizing and causes bleed through. Too much water and the page gets over saturated and the color can bleed through as well. This can take a bit of practice to figure out since the exact amount of water partially depends on how hard you press down on your brush.
Tracing Materials and Using it All Together

GT Luscombe has also included 16 sheets of tracing paper and 4 large sheets of graphite paper (which is very reusable) to finish off this kit. For those who don’t feel talented enough to draw things themselves or those who are too afraid of making a mistake in their Bibles this is an excellent method of getting an image on the page. Graphite paper is a bit harder to find then carbon paper but much better for use in your Bible since graphite is erasable.

A bit of washi tape helped hold the tracing paper in place while I copied this river bank scene. You could trace an image from a book or tablet screen. You could even draw your own artwork outside your Bible than use this method to transfer it in.

I traced the major elements of the entire image but knew not all of it would fit in my margin. I originally thought I’d trace the single tree and the entire river width higher in the margin but liked this placement better. The single piece of washi keeps the image paper from moving around while tracing and allows me to lift the paper to make sure I’m using enough pressure and have traced the entire picture.

Here’s the graphite tracing. Now is the time to erase any stray lines since if I get any paint on top they will no longer be erasable.

I used a couple sheets of copy paper as a shield for the pages beneath (mostly because I knew I wanted to paint right up to the edge) and put in all my big blocks of color using the watercolors.

Then I finished up the picture using the colored pencil to fill in gaps, do some outlining, and some shading. (My shading technique is still not as good as i’d like but it is improving.) I also went over the water lightly with the glitter pen to add some shimmer.

I put in my letttering with pencil then went back over it with the pens. I used the Micron 03 for most of the lettering and the Graphic One for the word LORD.

Here’s the finished journaling entry after erasing stray pencil marks in the lettering and working a bit more with the colored pencil. I also underlined the verses with the Micron using the ruler to get straight even lines. One added benefit of tracing images is that it slowly teaches you to draw. (kind of like tracing letters when you first learned to print)
Final Thoughts on the Foundations Bible Journaling Kit

This kit truly is everything you need to start art journaling in your Bible. The only other products I’ve used for any of the journaling shown are
- Prismacolor Colorless Blender Pencil (made it a bit easier to blend pencils but not essential)
- Washi Tape
- NLT Inspire Praise Bible (purchase from Amazon) (see review)
- The Everything Kids’ Nature Book (the source of my image)
Some versions of this kit might be slightly different. Because of available supply and additions to the Pigma Micron line depending on when the kit you purchase was put together it might have a different brand of watercolors or a slightly different pen assortment but in any configuration I highly recommend this kit for beginning Bible journalers. More experienced journalers might appreciate this as an already assembled travel kit even if they already have a variety of art supplies.
GT Luscombe provided this journaling kit free for review. I was not required to give a positive review, only an honest one. All opinions are my own.
_________________________________________________________
This kit is available at (includes some affiliate links)
Illuminated Journaling (Jann Gray’s site)
and many local Bible bookstores
_________________________________________________________
Photography by hannah C brown and Lucinda Brown





Trackbacks/Pingbacks